8mm Film projector LED conversion for digitizing old movie
8mm Film projector LED conversion for digitizing old movie
A co-worker of mine had recently acquired a used Super 8mm film projector with a burned bulb. Having a reputation of being somewhat of a tinkerer/mad scientist, he asked me if I could help him figure out a way to replace the bulb without buying a new one because, as it turn out, they are quite expensive and it would have costed more than what he paid for the projector. My plan was, as you might have guessed, to replace it with a LED! The project interested me as I remembered that my family also had a bunch of old Super 8mm film reel that has been stored for several decades waiting to be transfered. I had briefly attempted to digitize them around 2007 but cancelled my effort when I realised that the projector I had would constantly jam and tear up our very delicate film. So this was the perfect opportunity to jump back in.
My criteria/goals for this project were the following:
Produce a nice and bright image as good or better than the old hallogen bulb
Minimal modification to the projector
Reduce the risk of film burning/melting if the projector would jam and film would get stuck in front of the light(frequent issue with old projector and film)
Minimal cost and long lasting
I saw a few people online replacing those proprietary bulb with regular conical (MR8/MR11) type bulb that are readily available in store but we would still be dealing with bulb replacement and danger of burning the film if it get stuck during projection if we were to replace the orignal bulb with one of those. So I figured that the best way to proceed would be to experiment with high-power LED. I had an idea that COB LED would be the way to go for this but the only one I had were way too powerful and would get extremely hot so I went ahead and ordered a few LED of different package/type so I could experiment and hopefully find the perfect one for this application. I tested a few differents types of LED package and color temperature and ended up using a 10w Cold White COB LED. If you are not familiar with COB type LED, they are a fairly recent type of LED package that are composed of several hundreds of very tiny and bright LED assembled in a thin flat package with an aluminium backplate. They are suprisingly bright and easy to use but they do tend to heat up quite a bit. You might be surprised to read this as LEDs are usualy known to generate very little heat but this does not hold true for high power LED module and many of them run so hot that they require some kind of heatsink to dissipate the heat they produce.
While the LED I chose to use is very bright (look at it a few seconds and you'll have a nice red spot in your vision for a good hour), it might not be as bright as some halogen build. but it is actually what made it possible to transfer the movie that way as I did some test with the stock halogen bulb of another projector I acquired later on and it is simply too bright for the camera to capture anything but a bright blob of light. You could always use a higher wattage COB LED for this mod but it would only be usefull if your goal was to use the projector normally to project film and not to digitize them.
Here's a sample of how it looked like using a regular projector halogen bulb. It was simply too bright to give any visible picture.
The 10w COB 12v LED ended up being the perfect fit as the LED surface would fit really well with the projector's light plate opening. The only problem was, even with a 10w LED (which really isn't one of the more powerful module available), it would heat up so much that it would burn your finger even with different type of heaksink mounted on the back of it. I did a few prototypes to test, first using plate of aluminium mounted to the back of the LEDs module, then mounted to and motherboard chipset heatsink and even tried mounting it to an old laptop CPU heatsink that is using copper tubing and a small fan to disssipate the heat. Even the laptop CPU heatsink module would get extremely hot, which was very surprising considering it was made to cool off fast computer processor... Something had to be off as this didn't make any sense.
A test heatsink I fashioned out of an old laptop CPU heatsink to try to mitigate the really high temperature of the LED during my innitial testing
I ended up figuring it out that my issue was that I was driving the LEDs at 12v with my bench power supply and I am not sure if it's because I'm using cheap LEDs module from China but running the LEDs at its full capacity would make it heat up to a worringly high temperature, even when using a fairly big heatsink. I lowered the supply to around 11v and the LED cooled off significantly. The next issue I had was that the LED's brightness would not be stable. The intensity would fluctuate up and down slightly and I wasn't sure why. I went to research and found out that this kind of LED is not driven by voltage but by current. Connecting the power straight to the LED was not the best idea and using a LED Driver was much preferable. I ordered oen on eBay but I did not feel like waiting for week for it to arrive so researched on how I could built my own. I found a few designs online but ended up using a simple NPN transistor to regulate the current, which seemed to be taking care of the light flickering issue.
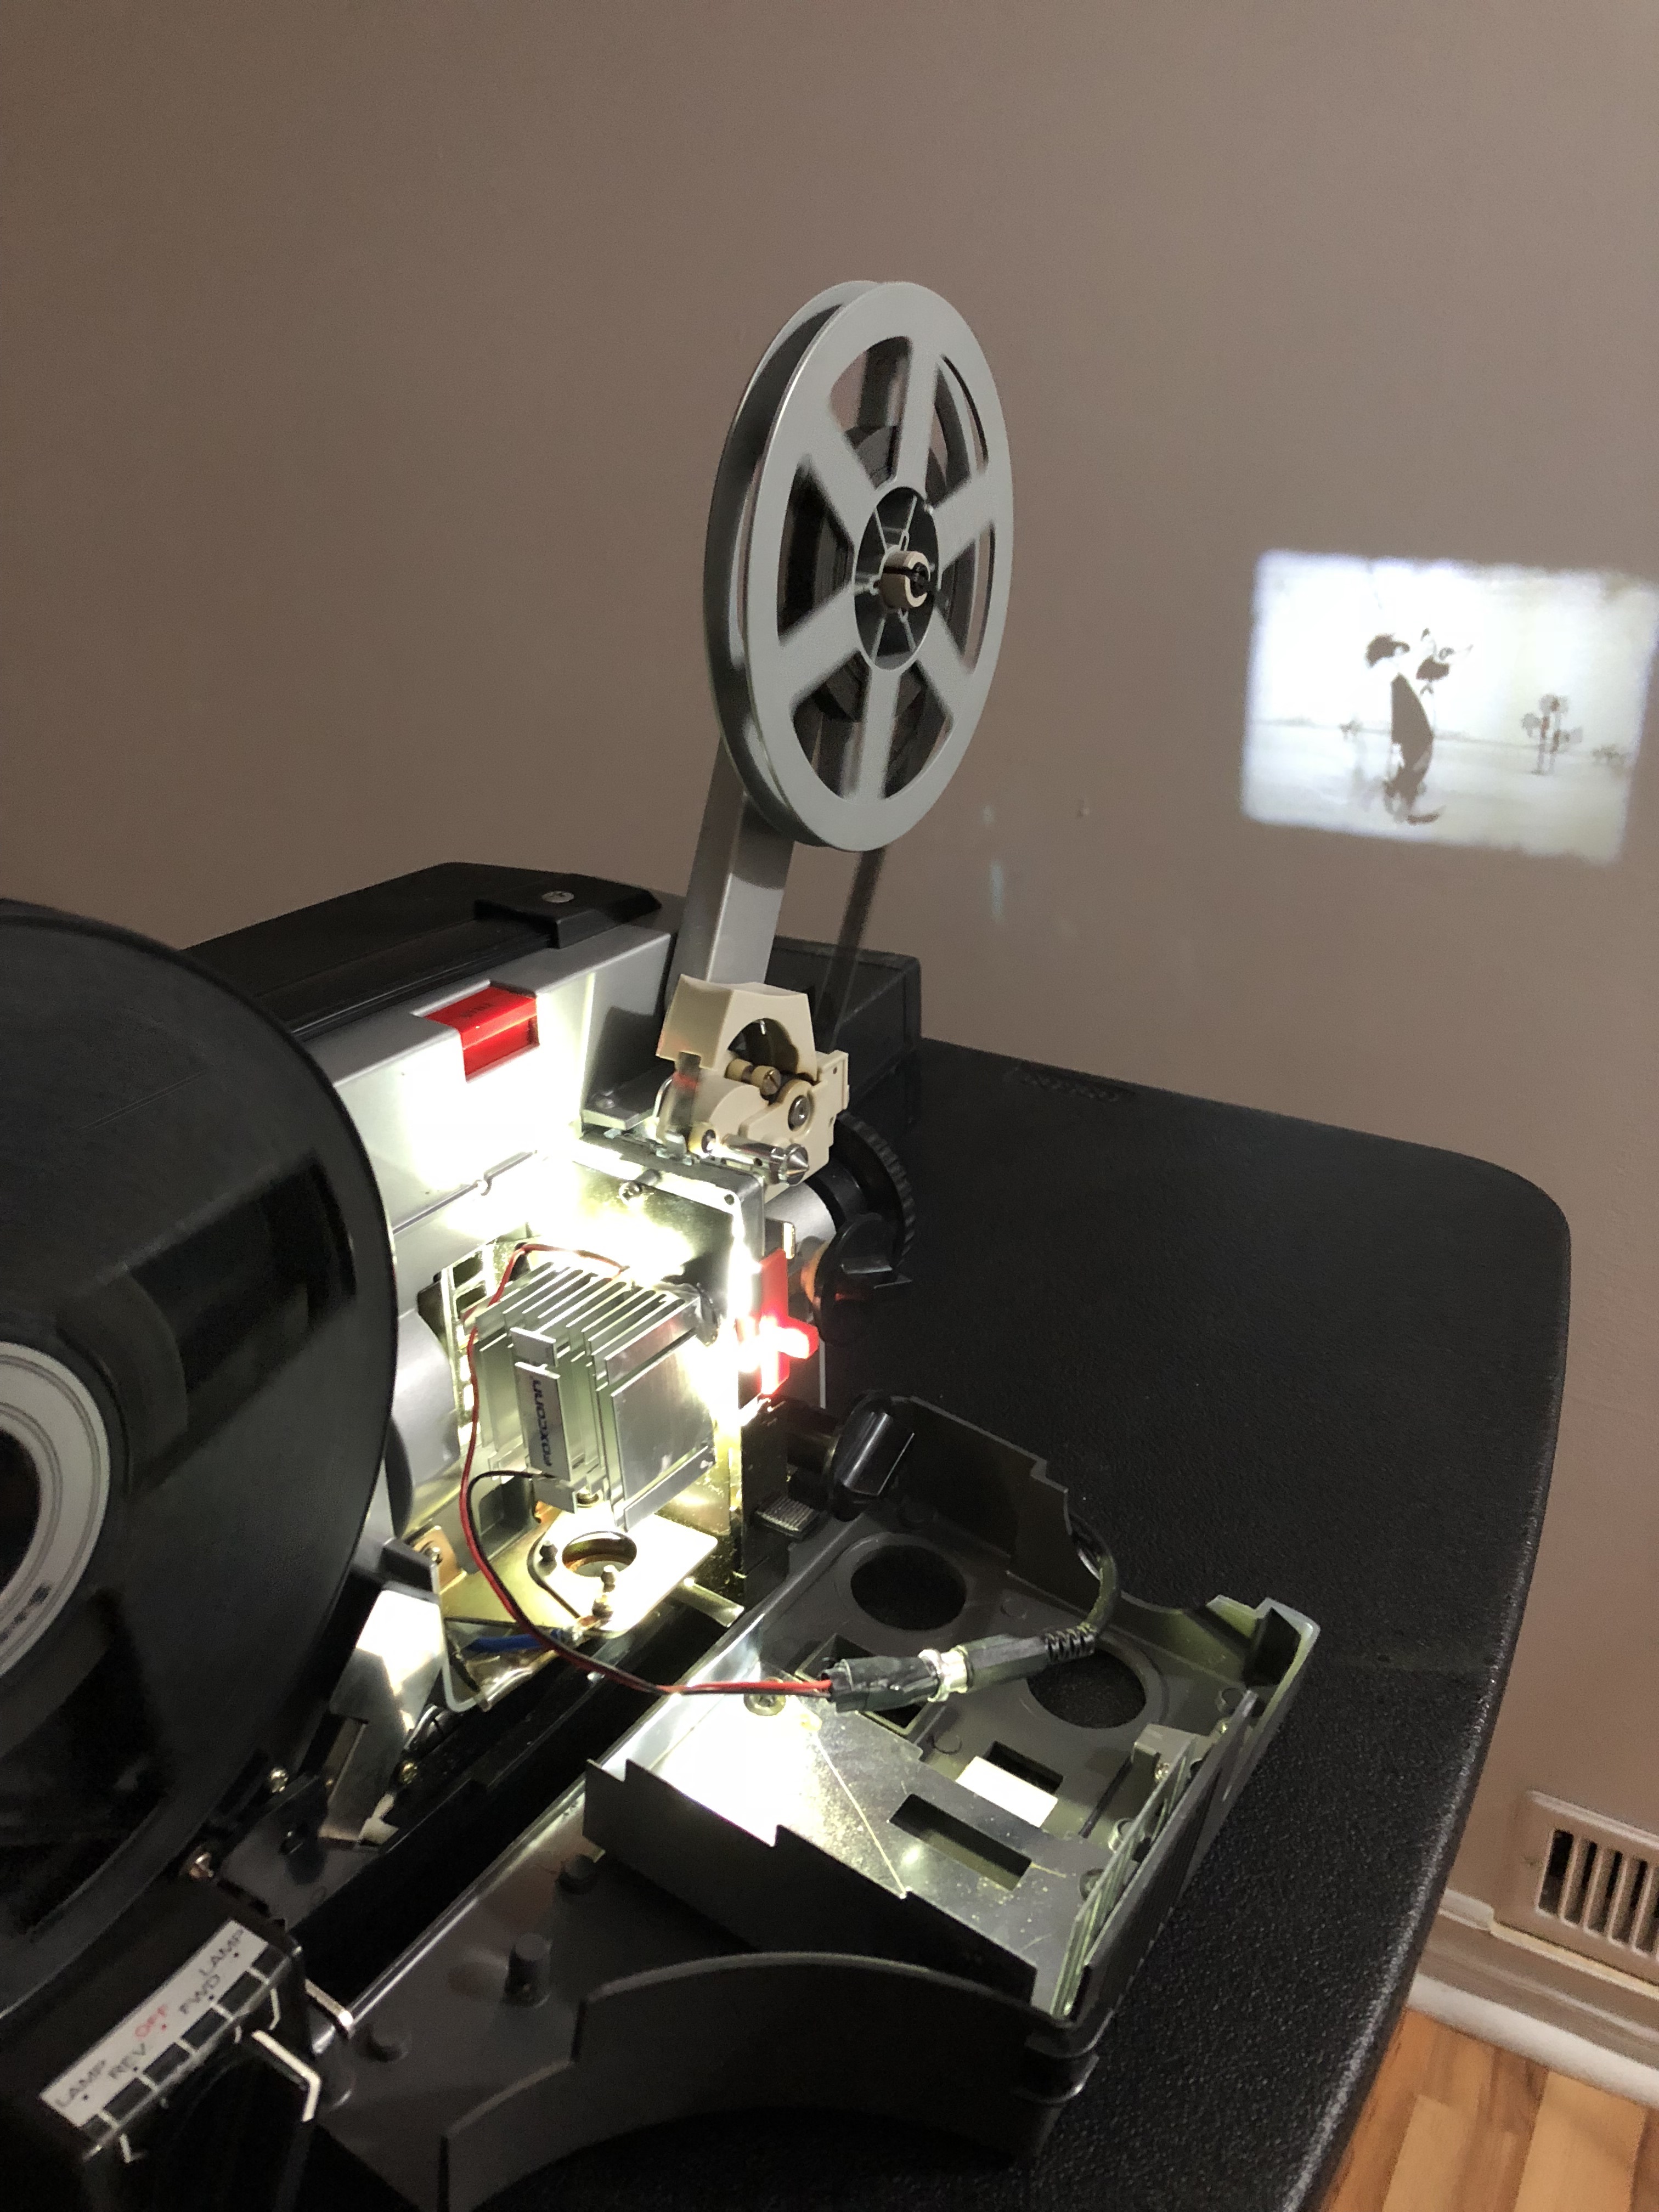
I wanted to limit the ammount of modification to the projector I would ahve to do and I had the idea of re-using the old projector's lamp's socket to mount the LED but I went an easier way and used magnet. This way, you could just pop-out the LED and replace it with the stock halogen bulb. I don't see why anyone would do that, but the possibility is there. I was able to drill small hole in an old passive motherboard chipset's heatsink and screw the COB LED moduel right on it but there was no way I could drill the magnet to mount them. Gleu wouldn't cut it either since the heatsink would heat up and the glue was bound to fail. So I bought some thermal adhesive paste on ebay, the same kind that is used to glue heatsink on smaller chip so I knew it woudl withstand the heat produced by the LED. And since I had the paste to glue the magnet, I added some under the LED backplate to aid in the heat dissipation and created a small mounting hole on the side for the regulator (sicne it also can generate a bit of heat).
I then soldered a barrel type power plug to make it easy to connect and disconnect the LED and my bulb replacement was complete!
The magnet are just strong enough to stick to the projector's plate and the LED module can be removed or repositionned easily.
Successful first test run with Woody Woodpecker!
The first test was a success and the iamge was clear and bright. But I noticed though that, when the image was white, there was a very suttle yellow hue going vertically near the center of the projection and it wouldn't go away no matter how I would move the LED. I remembered that I read online in a forum for 8mm fan (there's more than you think:P) that someone had an issue with their projection being completly clouded/yellowed and another user suggested she remove the plastic plate where the film get projected. They were saying it was made of some type of plastic and that they sometime get cloudy/yellow over time. I figured it might be the part I needed to investigate. It came with a warning that it also help stop the heat a bit in case the film get stuck in front of the bulb but since I replaced it for LED it wouldn't be a problem.
I dissassembled the plate near where the film passed and found that my plastic piece was not damaged at all and was still crystal clear, but it had a separation in the middle. It seem to be intentionnal in its design but I figured that the LED light path is probably not the same as the old halogen builb was and the light beam might be getting caught up in that little plastic separation and get redirected like light going through a prysm. I removed it fairly easily by unbending the metal flap holding it in place agains't the metal plate, screwed the plate back where it was and voila, clear projection with no yellowish hue!
I know frame by frame transfer where each frame get capture and then animated provide better quality transfer, but I wanted to have a decent transfer done without spending any money on buying equipment or paying for a transfer service so I experimented with a few things to see if I could get decent result that way. I bought an old school video transfer box on ebay thinking it would be the best way. If you are nto familiar with those transfer box, it's a special box with a mirror inside of it and a mat screen on the other side. The idea is that you project your film inside the box opening, the image get transfered with the mirror to the small mat screen and you film that screen with a camera. To give you a better idea, here's how it look like.
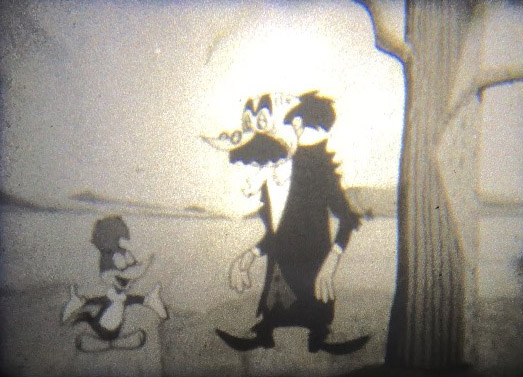
I was very dissapointed with that method as the little screen would give a very grainy image. It might not have been so noticeable with old school camcorder that people were using back when those transfer box were sold but it was almost unwatcheable for me using a modern HD camera.
Here's a sample image from a Woody Woodpecker movie to give you an idea of what I am refering to:
I tried a few different things and camera and I couldn't get decent enought result to warrant starting to transfer the old family movie. I don't have a DSLR only my point and shoot camera that usualy take very decent high definition video and my iPhone 8. The problem with point and shoot camera that most people have is that they are very easy to use at the cost of control. What I mean by this is that there is no way to customise any settings. The one I have can't even manually focus in filming mode so my 8mm movie transfer would turn out super blury. Also, since 8mm projector speed can vary between 16 to 24 FPS, I woudl get bad flickering on the transfer. I tried with my iPhone 8 since it had a decent camera for a phone but it was the same problem with lack of control. I was about to give up when I found out that there is some advanced camera apps available on the app store that give you more control over the iPhone camera. They were made to give similar control over setting similarly to what you would be able to do on a DSLR camera like playing with shutter speed, taking picture in RAW format and playing with exposure and such. It is not free but it was under 10$ so I decided to try one of the more popular one called ProCam. It allowed me to adjust critical settings like the number of FPS to try and get closer to the FPS of the projector, remove the flicker by playing with the shutter speed, adjust the white temperature and such. It was a game changer for this project and made my transfer very whatcheable.
My transfer setup was very simple, projector on a table positionned about 30cm from the wall where I taped a white sheet of paper. I then took a car phoen stand I had laying around and screwed it to a plank of wood. I adjusted the playback speed of the projector to the slower mode, adjusted the shutter speed setting until the flicker went away and shot with my iPhone at 24FPS.
Then it was a matter of closing the light and making the room as dark as possible, starting the recording on my phone and starting the projection. I couldn't just put my phone dead in the center to shoot the movie as it would block the projector beam so I would position the phone slightly on the right and move it as close as I could without obstructing the beam of light of the projector. Then I would make sure that the phone and projector were straight so I would nto end up with a skewed movie (ProCam has a grid option you can enable that help alot for that part). After I was done filming, I would just transfer them to my computer and load them up in Adobe After effect so I could reframe them properly and cut the unnecessary part when the reel start and such. I also tried removing a bit of the grain with Neat Video's filter and then save it as the final video. For some reason, After Effect refuse to load my iPhone 8 .MOV file stating they are not compatible but I found out somewhere on the internet that you could renamed them to .M4V and After Effect would then happily open the same video file and work with them after. Go figure.
To give you a rough idea of the difference compared to the previous sample made with the film transfer box, here is the same Woody Woodpecker scene shot directly on the sheet of paper hanging on the wall without any further retouching:
All in all in my opinion, it was a success. The LED is bright and give a nice projection and it barely heat up so there is now zero chance of your precious film burning if it ever get stuck in front of the lamp like it used to with the stock bulb. I tested it runnign for a good hour and the heatsink is more than enough to cool it. On top of the heatsink, projector have fan that were built in to help cool of the burning hot halogen bulb they were using so it remove any heat build up that your LED module might have. The LED modification allowed me to transfer all my dad's old 8mm movie that were gathering dust for decade in his wardrobe.
Here is a sample of all that work.
#SimpleVideoPlayer{
cursor: pointer;
}
Your browser does not support HTML5 video.
var VideoIndex = 1;
var PlayList = [ "/images/8mmLED/DBWBP.com_Sample_8mm_Transfer.mp4",
];
var PlayListTotal = PlayList.length;
var videoPlayer = document.getElementById('SimpleVideoPlayer');
$( "#SimpleVideoPlayer" ).click(function() {
var videoPlayer = document.getElementById('SimpleVideoPlayer');
if (videoPlayer.paused){
videoPlayer.play();
}else{
videoPlayer.pause();
}
});
It is obviously not comparable to a proper frame by frame professionnal transfer but It was mostly free and the people that have seen the transfer seem to have no complain and enjoyed them on big screen HD TV. I'm sure I could make it better by playing with setting and After Effect but I find them good enough for now. And an OK transfer is better than no transfer at all! Those films degrade every day and now I know my family can watch them for the first time and enjoy them until the day where I get proper equipement to do a better transfer.Twitter
(function(d, s, id) {
var js, fjs = d.getElementsByTagName(s)[0];
if (d.getElementById(id)) {return;}
js = d.createElement(s); js.id = id;
js.src = "//connect.facebook.net/en_GB/all.js#xfbml=1";
fjs.parentNode.insertBefore(js, fjs);
}(document, 'script', 'facebook-jssdk'));{lang: 'en-GB'}
A co-worker of mine had recently acquired a used Super 8mm film projector with a burned bulb. Having a reputation of being somewhat of a tinkerer/mad scientist, he asked me if I could help him figure out a way to replace the bulb without buying a new one because, as it turn out, they are quite expensive and it would have costed more than what he paid for the projector. My plan was, as you might have guessed, to replace it with a LED! The project interested me as I remembered that my family also had a bunch of old Super 8mm film reel that has been stored for several decades waiting to be transfered. I had briefly attempted to digitize them around 2007 but cancelled my effort when I realised that the projector I had would constantly jam and tear up our very delicate film. So this was the perfect opportunity to jump back in.
My criteria/goals for this project were the following:
Produce a nice and bright image as good or better than the old hallogen bulb
Minimal modification to the projector
Reduce the risk of film burning/melting if the projector would jam and film would get stuck in front of the light(frequent issue with old projector and film)
Minimal cost and long lasting
I saw a few people online replacing those proprietary bulb with regular conical (MR8/MR11) type bulb that are readily available in store but we would still be dealing with bulb replacement and danger of burning the film if it get stuck during projection if we were to replace the orignal bulb with one of those. So I figured that the best way to proceed would be to experiment with high-power LED. I had an idea that COB LED would be the way to go for this but the only one I had were way too powerful and would get extremely hot so I went ahead and ordered a few LED of different package/type so I could experiment and hopefully find the perfect one for this application. I tested a few differents types of LED package and color temperature and ended up using a 10w Cold White COB LED. If you are not familiar with COB type LED, they are a fairly recent type of LED package that are composed of several hundreds of very tiny and bright LED assembled in a thin flat package with an aluminium backplate. They are suprisingly bright and easy to use but they do tend to heat up quite a bit. You might be surprised to read this as LEDs are usualy known to generate very little heat but this does not hold true for high power LED module and many of them run so hot that they require some kind of heatsink to dissipate the heat they produce.
While the LED I chose to use is very bright (look at it a few seconds and you'll have a nice red spot in your vision for a good hour), it might not be as bright as some halogen build. but it is actually what made it possible to transfer the movie that way as I did some test with the stock halogen bulb of another projector I acquired later on and it is simply too bright for the camera to capture anything but a bright blob of light. You could always use a higher wattage COB LED for this mod but it would only be usefull if your goal was to use the projector normally to project film and not to digitize them.
Here's a sample of how it looked like using a regular projector halogen bulb. It was simply too bright to give any visible picture.
The 10w COB 12v LED ended up being the perfect fit as the LED surface would fit really well with the projector's light plate opening. The only problem was, even with a 10w LED (which really isn't one of the more powerful module available), it would heat up so much that it would burn your finger even with different type of heaksink mounted on the back of it. I did a few prototypes to test, first using plate of aluminium mounted to the back of the LEDs module, then mounted to and motherboard chipset heatsink and even tried mounting it to an old laptop CPU heatsink that is using copper tubing and a small fan to disssipate the heat. Even the laptop CPU heatsink module would get extremely hot, which was very surprising considering it was made to cool off fast computer processor... Something had to be off as this didn't make any sense.
A test heatsink I fashioned out of an old laptop CPU heatsink to try to mitigate the really high temperature of the LED during my innitial testing
I ended up figuring it out that my issue was that I was driving the LEDs at 12v with my bench power supply and I am not sure if it's because I'm using cheap LEDs module from China but running the LEDs at its full capacity would make it heat up to a worringly high temperature, even when using a fairly big heatsink. I lowered the supply to around 11v and the LED cooled off significantly. The next issue I had was that the LED's brightness would not be stable. The intensity would fluctuate up and down slightly and I wasn't sure why. I went to research and found out that this kind of LED is not driven by voltage but by current. Connecting the power straight to the LED was not the best idea and using a LED Driver was much preferable. I ordered oen on eBay but I did not feel like waiting for week for it to arrive so researched on how I could built my own. I found a few designs online but ended up using a simple NPN transistor to regulate the current, which seemed to be taking care of the light flickering issue.
I wanted to limit the ammount of modification to the projector I would ahve to do and I had the idea of re-using the old projector's lamp's socket to mount the LED but I went an easier way and used magnet. This way, you could just pop-out the LED and replace it with the stock halogen bulb. I don't see why anyone would do that, but the possibility is there. I was able to drill small hole in an old passive motherboard chipset's heatsink and screw the COB LED moduel right on it but there was no way I could drill the magnet to mount them. Gleu wouldn't cut it either since the heatsink would heat up and the glue was bound to fail. So I bought some thermal adhesive paste on ebay, the same kind that is used to glue heatsink on smaller chip so I knew it woudl withstand the heat produced by the LED. And since I had the paste to glue the magnet, I added some under the LED backplate to aid in the heat dissipation and created a small mounting hole on the side for the regulator (sicne it also can generate a bit of heat).
I then soldered a barrel type power plug to make it easy to connect and disconnect the LED and my bulb replacement was complete!
The magnet are just strong enough to stick to the projector's plate and the LED module can be removed or repositionned easily.
Successful first test run with Woody Woodpecker!
The first test was a success and the iamge was clear and bright. But I noticed though that, when the image was white, there was a very suttle yellow hue going vertically near the center of the projection and it wouldn't go away no matter how I would move the LED. I remembered that I read online in a forum for 8mm fan (there's more than you think:P) that someone had an issue with their projection being completly clouded/yellowed and another user suggested she remove the plastic plate where the film get projected. They were saying it was made of some type of plastic and that they sometime get cloudy/yellow over time. I figured it might be the part I needed to investigate. It came with a warning that it also help stop the heat a bit in case the film get stuck in front of the bulb but since I replaced it for LED it wouldn't be a problem.
I dissassembled the plate near where the film passed and found that my plastic piece was not damaged at all and was still crystal clear, but it had a separation in the middle. It seem to be intentionnal in its design but I figured that the LED light path is probably not the same as the old halogen builb was and the light beam might be getting caught up in that little plastic separation and get redirected like light going through a prysm. I removed it fairly easily by unbending the metal flap holding it in place agains't the metal plate, screwed the plate back where it was and voila, clear projection with no yellowish hue!
I know frame by frame transfer where each frame get capture and then animated provide better quality transfer, but I wanted to have a decent transfer done without spending any money on buying equipment or paying for a transfer service so I experimented with a few things to see if I could get decent result that way. I bought an old school video transfer box on ebay thinking it would be the best way. If you are nto familiar with those transfer box, it's a special box with a mirror inside of it and a mat screen on the other side. The idea is that you project your film inside the box opening, the image get transfered with the mirror to the small mat screen and you film that screen with a camera. To give you a better idea, here's how it look like.
I was very dissapointed with that method as the little screen would give a very grainy image. It might not have been so noticeable with old school camcorder that people were using back when those transfer box were sold but it was almost unwatcheable for me using a modern HD camera.
Here's a sample image from a Woody Woodpecker movie to give you an idea of what I am refering to:
I tried a few different things and camera and I couldn't get decent enought result to warrant starting to transfer the old family movie. I don't have a DSLR only my point and shoot camera that usualy take very decent high definition video and my iPhone 8. The problem with point and shoot camera that most people have is that they are very easy to use at the cost of control. What I mean by this is that there is no way to customise any settings. The one I have can't even manually focus in filming mode so my 8mm movie transfer would turn out super blury. Also, since 8mm projector speed can vary between 16 to 24 FPS, I woudl get bad flickering on the transfer. I tried with my iPhone 8 since it had a decent camera for a phone but it was the same problem with lack of control. I was about to give up when I found out that there is some advanced camera apps available on the app store that give you more control over the iPhone camera. They were made to give similar control over setting similarly to what you would be able to do on a DSLR camera like playing with shutter speed, taking picture in RAW format and playing with exposure and such. It is not free but it was under 10$ so I decided to try one of the more popular one called ProCam. It allowed me to adjust critical settings like the number of FPS to try and get closer to the FPS of the projector, remove the flicker by playing with the shutter speed, adjust the white temperature and such. It was a game changer for this project and made my transfer very whatcheable.
My transfer setup was very simple, projector on a table positionned about 30cm from the wall where I taped a white sheet of paper. I then took a car phoen stand I had laying around and screwed it to a plank of wood. I adjusted the playback speed of the projector to the slower mode, adjusted the shutter speed setting until the flicker went away and shot with my iPhone at 24FPS.
Then it was a matter of closing the light and making the room as dark as possible, starting the recording on my phone and starting the projection. I couldn't just put my phone dead in the center to shoot the movie as it would block the projector beam so I would position the phone slightly on the right and move it as close as I could without obstructing the beam of light of the projector. Then I would make sure that the phone and projector were straight so I would nto end up with a skewed movie (ProCam has a grid option you can enable that help alot for that part). After I was done filming, I would just transfer them to my computer and load them up in Adobe After effect so I could reframe them properly and cut the unnecessary part when the reel start and such. I also tried removing a bit of the grain with Neat Video's filter and then save it as the final video. For some reason, After Effect refuse to load my iPhone 8 .MOV file stating they are not compatible but I found out somewhere on the internet that you could renamed them to .M4V and After Effect would then happily open the same video file and work with them after. Go figure.
To give you a rough idea of the difference compared to the previous sample made with the film transfer box, here is the same Woody Woodpecker scene shot directly on the sheet of paper hanging on the wall without any further retouching:
All in all in my opinion, it was a success. The LED is bright and give a nice projection and it barely heat up so there is now zero chance of your precious film burning if it ever get stuck in front of the lamp like it used to with the stock bulb. I tested it runnign for a good hour and the heatsink is more than enough to cool it. On top of the heatsink, projector have fan that were built in to help cool of the burning hot halogen bulb they were using so it remove any heat build up that your LED module might have. The LED modification allowed me to transfer all my dad's old 8mm movie that were gathering dust for decade in his wardrobe.
Here is a sample of all that work.
#SimpleVideoPlayer{
cursor: pointer;
}
Your browser does not support HTML5 video.
var VideoIndex = 1;
var PlayList = [ "/images/8mmLED/DBWBP.com_Sample_8mm_Transfer.mp4",
];
var PlayListTotal = PlayList.length;
var videoPlayer = document.getElementById('SimpleVideoPlayer');
$( "#SimpleVideoPlayer" ).click(function() {
var videoPlayer = document.getElementById('SimpleVideoPlayer');
if (videoPlayer.paused){
videoPlayer.play();
}else{
videoPlayer.pause();
}
});
It is obviously not comparable to a proper frame by frame professionnal transfer but It was mostly free and the people that have seen the transfer seem to have no complain and enjoyed them on big screen HD TV. I'm sure I could make it better by playing with setting and After Effect but I find them good enough for now. And an OK transfer is better than no transfer at all! Those films degrade every day and now I know my family can watch them for the first time and enjoy them until the day where I get proper equipement to do a better transfer.Twitter
(function(d, s, id) {
var js, fjs = d.getElementsByTagName(s)[0];
if (d.getElementById(id)) {return;}
js = d.createElement(s); js.id = id;
js.src = "//connect.facebook.net/en_GB/all.js#xfbml=1";
fjs.parentNode.insertBefore(js, fjs);
}(document, 'script', 'facebook-jssdk'));{lang: 'en-GB'}
40 out of
100 with
1 ratings
A co-worker of mine had recently acquired a used Super 8mm film projector with a burned bulb. Having a reputation of being somewhat of a tinkerer/mad scientist, he asked me if I could help him figure out a way to replace the bulb without buying a new one because, as it turn out, they are quite expensive and it would have costed more than what he paid for the projector. My plan was, as you might have guessed, to replace it with a LED! The project interested me as I remembered that my family also had a bunch of old Super 8mm film reel that has been stored for several decades waiting to be transfered. I had briefly attempted to digitize them around 2007 but cancelled my effort when I realised that the projector I had would constantly jam and tear up our very delicate film. So this was the perfect opportunity to jump back in.
My criteria/goals for this project were the following:
Produce a nice and bright image as good or better than the old hallogen bulb
Minimal modification to the projector
Reduce the risk of film burning/melting if the projector would jam and film would get stuck in front of the light(frequent issue with old projector and film)
Minimal cost and long lasting
I saw a few people online replacing those proprietary bulb with regular conical (MR8/MR11) type bulb that are readily available in store but we would still be dealing with bulb replacement and danger of burning the film if it get stuck during projection if we were to replace the orignal bulb with one of those. So I figured that the best way to proceed would be to experiment with high-power LED. I had an idea that COB LED would be the way to go for this but the only one I had were way too powerful and would get extremely hot so I went ahead and ordered a few LED of different package/type so I could experiment and hopefully find the perfect one for this application. I tested a few differents types of LED package and color temperature and ended up using a 10w Cold White COB LED. If you are not familiar with COB type LED, they are a fairly recent type of LED package that are composed of several hundreds of very tiny and bright LED assembled in a thin flat package with an aluminium backplate. They are suprisingly bright and easy to use but they do tend to heat up quite a bit. You might be surprised to read this as LEDs are usualy known to generate very little heat but this does not hold true for high power LED module and many of them run so hot that they require some kind of heatsink to dissipate the heat they produce.
While the LED I chose to use is very bright (look at it a few seconds and you'll have a nice red spot in your vision for a good hour), it might not be as bright as some halogen build. but it is actually what made it possible to transfer the movie that way as I did some test with the stock halogen bulb of another projector I acquired later on and it is simply too bright for the camera to capture anything but a bright blob of light. You could always use a higher wattage COB LED for this mod but it would only be usefull if your goal was to use the projector normally to project film and not to digitize them.
Here's a sample of how it looked like using a regular projector halogen bulb. It was simply too bright to give any visible picture.
The 10w COB 12v LED ended up being the perfect fit as the LED surface would fit really well with the projector's light plate opening. The only problem was, even with a 10w LED (which really isn't one of the more powerful module available), it would heat up so much that it would burn your finger even with different type of heaksink mounted on the back of it. I did a few prototypes to test, first using plate of aluminium mounted to the back of the LEDs module, then mounted to and motherboard chipset heatsink and even tried mounting it to an old laptop CPU heatsink that is using copper tubing and a small fan to disssipate the heat. Even the laptop CPU heatsink module would get extremely hot, which was very surprising considering it was made to cool off fast computer processor... Something had to be off as this didn't make any sense.
A test heatsink I fashioned out of an old laptop CPU heatsink to try to mitigate the really high temperature of the LED during my innitial testing
I ended up figuring it out that my issue was that I was driving the LEDs at 12v with my bench power supply and I am not sure if it's because I'm using cheap LEDs module from China but running the LEDs at its full capacity would make it heat up to a worringly high temperature, even when using a fairly big heatsink. I lowered the supply to around 11v and the LED cooled off significantly. The next issue I had was that the LED's brightness would not be stable. The intensity would fluctuate up and down slightly and I wasn't sure why. I went to research and found out that this kind of LED is not driven by voltage but by current. Connecting the power straight to the LED was not the best idea and using a LED Driver was much preferable. I ordered oen on eBay but I did not feel like waiting for week for it to arrive so researched on how I could built my own. I found a few designs online but ended up using a simple NPN transistor to regulate the current, which seemed to be taking care of the light flickering issue.
I wanted to limit the ammount of modification to the projector I would ahve to do and I had the idea of re-using the old projector's lamp's socket to mount the LED but I went an easier way and used magnet. This way, you could just pop-out the LED and replace it with the stock halogen bulb. I don't see why anyone would do that, but the possibility is there. I was able to drill small hole in an old passive motherboard chipset's heatsink and screw the COB LED moduel right on it but there was no way I could drill the magnet to mount them. Gleu wouldn't cut it either since the heatsink would heat up and the glue was bound to fail. So I bought some thermal adhesive paste on ebay, the same kind that is used to glue heatsink on smaller chip so I knew it woudl withstand the heat produced by the LED. And since I had the paste to glue the magnet, I added some under the LED backplate to aid in the heat dissipation and created a small mounting hole on the side for the regulator (sicne it also can generate a bit of heat).
I then soldered a barrel type power plug to make it easy to connect and disconnect the LED and my bulb replacement was complete!
The magnet are just strong enough to stick to the projector's plate and the LED module can be removed or repositionned easily.
Successful first test run with Woody Woodpecker!
The first test was a success and the iamge was clear and bright. But I noticed though that, when the image was white, there was a very suttle yellow hue going vertically near the center of the projection and it wouldn't go away no matter how I would move the LED. I remembered that I read online in a forum for 8mm fan (there's more than you think:P) that someone had an issue with their projection being completly clouded/yellowed and another user suggested she remove the plastic plate where the film get projected. They were saying it was made of some type of plastic and that they sometime get cloudy/yellow over time. I figured it might be the part I needed to investigate. It came with a warning that it also help stop the heat a bit in case the film get stuck in front of the bulb but since I replaced it for LED it wouldn't be a problem.
I dissassembled the plate near where the film passed and found that my plastic piece was not damaged at all and was still crystal clear, but it had a separation in the middle. It seem to be intentionnal in its design but I figured that the LED light path is probably not the same as the old halogen builb was and the light beam might be getting caught up in that little plastic separation and get redirected like light going through a prysm. I removed it fairly easily by unbending the metal flap holding it in place agains't the metal plate, screwed the plate back where it was and voila, clear projection with no yellowish hue!
I know frame by frame transfer where each frame get capture and then animated provide better quality transfer, but I wanted to have a decent transfer done without spending any money on buying equipment or paying for a transfer service so I experimented with a few things to see if I could get decent result that way. I bought an old school video transfer box on ebay thinking it would be the best way. If you are nto familiar with those transfer box, it's a special box with a mirror inside of it and a mat screen on the other side. The idea is that you project your film inside the box opening, the image get transfered with the mirror to the small mat screen and you film that screen with a camera. To give you a better idea, here's how it look like.
I was very dissapointed with that method as the little screen would give a very grainy image. It might not have been so noticeable with old school camcorder that people were using back when those transfer box were sold but it was almost unwatcheable for me using a modern HD camera.
Here's a sample image from a Woody Woodpecker movie to give you an idea of what I am refering to:
I tried a few different things and camera and I couldn't get decent enought result to warrant starting to transfer the old family movie. I don't have a DSLR only my point and shoot camera that usualy take very decent high definition video and my iPhone 8. The problem with point and shoot camera that most people have is that they are very easy to use at the cost of control. What I mean by this is that there is no way to customise any settings. The one I have can't even manually focus in filming mode so my 8mm movie transfer would turn out super blury. Also, since 8mm projector speed can vary between 16 to 24 FPS, I woudl get bad flickering on the transfer. I tried with my iPhone 8 since it had a decent camera for a phone but it was the same problem with lack of control. I was about to give up when I found out that there is some advanced camera apps available on the app store that give you more control over the iPhone camera. They were made to give similar control over setting similarly to what you would be able to do on a DSLR camera like playing with shutter speed, taking picture in RAW format and playing with exposure and such. It is not free but it was under 10$ so I decided to try one of the more popular one called ProCam. It allowed me to adjust critical settings like the number of FPS to try and get closer to the FPS of the projector, remove the flicker by playing with the shutter speed, adjust the white temperature and such. It was a game changer for this project and made my transfer very whatcheable.
My transfer setup was very simple, projector on a table positionned about 30cm from the wall where I taped a white sheet of paper. I then took a car phoen stand I had laying around and screwed it to a plank of wood. I adjusted the playback speed of the projector to the slower mode, adjusted the shutter speed setting until the flicker went away and shot with my iPhone at 24FPS.
Then it was a matter of closing the light and making the room as dark as possible, starting the recording on my phone and starting the projection. I couldn't just put my phone dead in the center to shoot the movie as it would block the projector beam so I would position the phone slightly on the right and move it as close as I could without obstructing the beam of light of the projector. Then I would make sure that the phone and projector were straight so I would nto end up with a skewed movie (ProCam has a grid option you can enable that help alot for that part). After I was done filming, I would just transfer them to my computer and load them up in Adobe After effect so I could reframe them properly and cut the unnecessary part when the reel start and such. I also tried removing a bit of the grain with Neat Video's filter and then save it as the final video. For some reason, After Effect refuse to load my iPhone 8 .MOV file stating they are not compatible but I found out somewhere on the internet that you could renamed them to .M4V and After Effect would then happily open the same video file and work with them after. Go figure.
To give you a rough idea of the difference compared to the previous sample made with the film transfer box, here is the same Woody Woodpecker scene shot directly on the sheet of paper hanging on the wall without any further retouching:
All in all in my opinion, it was a success. The LED is bright and give a nice projection and it barely heat up so there is now zero chance of your precious film burning if it ever get stuck in front of the lamp like it used to with the stock bulb. I tested it runnign for a good hour and the heatsink is more than enough to cool it. On top of the heatsink, projector have fan that were built in to help cool of the burning hot halogen bulb they were using so it remove any heat build up that your LED module might have. The LED modification allowed me to transfer all my dad's old 8mm movie that were gathering dust for decade in his wardrobe.
Here is a sample of all that work.
It is obviously not comparable to a proper frame by frame professionnal transfer but It was mostly free and the people that have seen the transfer seem to have no complain and enjoyed them on big screen HD TV. I'm sure I could make it better by playing with setting and After Effect but I find them good enough for now. And an OK transfer is better than no transfer at all! Those films degrade every day and now I know my family can watch them for the first time and enjoy them until the day where I get proper equipement to do a better transfer.