PSP Go Micro SD card slot modification
PSP Go Micro SD card slot modification
I was looking on eBay for a new PSP after my regular PSP started to have too many issues and decided to go for a PSP Go. The lack of UMD drive didn't bother me at all since I was mainly using it to play emulator from the memory card and the small size of the PSP Go really appealed to me. My only gripe with it was it's use of expensive proprietary memory card. While the original PSP model did use Memory Stick Duo pro, it wasn't really an issue since there was micro SD to memory stick adapter widely available for a few bucks on eBay. With these, I was able to use regular and much cheaper micro SD card. But the PSP Go use the smaller Memory Stick Micro M2 (will be referred to M" from now on), which is basically a smaller form factor version of the Memory Stick Duo used in the original PSP. Problem is, there is no way that there will ever be a Micro SD to M2 adapter, not because it is not possible because it is, but because of the size of the card. The only way it could be made would have something sticking out of the card slot. The biggest M2 available seem to be 32gb and very expensive. Considering the PSP Go comes with 16gb of built-in memory, it ain't as bad as it could be, but with all the emulators available I still thought it would be nice to use regular micro SD card. So I did what I always do when I have an idea like this and went to search on good old Google only to find out that, surprisingly, nobody seems to have ever attempted such a modification. Or if someone has, they did not document it. This mod was made way back in 2012 but I could never post the article because I had lost my note about it and redo it to confirm my information before posting. As a result, there might be some information available now that wasn't when I looked into it a few years ago.
I figured that the technical aspect of the mod would be very straightforward and trivial. My main concern was more in regard to whether there would be enough space inside the very compact PSP Go. After disassembling my PSP Go and investigating a bit on how it is put together, I decided that I should be able to pull it off and started to think of a plan. My idea was to de-solder the M2 card slot, replace it with a Micro SD card slot and to use the circuit from one of those Micro SD to Memory Stick Pro Duo adapter to do the proper conversion. It should work since the Memory Stick Duo Pro and M2 version are essentially the same thing with different pin-out and form factor. But in order to minimize the headache and troubleshooting later on, I decided I had to test my idea first and have my PSP Go read from a regular Memory Stick Duo Pro. Needless to say that If I couldn't make that happen, the rest of the plan would fall apart. So my first order of business was to figure out the M2 connection on the PSP Go motherboard and wire up a regular Memory Stick Duo Pro card slot to it to do the initial test.
A word of warning before we begin. This modification requires some precise soldering/de-soldering work and it could easily damage your PSP Go system if done improperly. If you are unsure about whether you can do it or not, you should probably avoid attempting this. Or at least be ready for the idea that you might break something, sometime it's the best way to learn;) But even if you mess it up., there is a good chance that you would only lose the use of the memory card, your PSP Go should still function as it should unless you end up breaking a connector or a ribbon cable during dis-assembly.
First thing you need to do is disassemble your PSP Go (obviously), I won't really document that step as there is already many place online where you can get help on that. You can probably do that without information as the PSP Go's assembly is not really that hard to figure out but if you need some help there are many videos on YouTube showing you how to disassemble it. Personally, I am a bit old school when it come to that kind of thing and always prefer a good picture tutorial when I get stuck somewhere, I recommend the excellent tear down guide from ifixit (ifixit PSP Go disassembly guide), they always have high quality pictures for all their teardown guide and are very informative. Once you have gained access to the motherboard, we can get down to business and start removing the M2 card slot. You need to be very careful at that state because the M2 card slot is very tricky to de-solder. You see, the contacts for the slot are not easily accessible, they are basically hidden under the metal housing which makes it close to impossible to remove cleanly. Since I had basically no intention of ever using Sony's proprietary memory card, even if my modding attempt failed, I decided it was OK to scrap it. The PSP go circuit board is very delicate and contain extremely tiny surface mount components so you need to proceed with extreme caution if you are attempting this mod, especially while removing the card slot.
First thing I did was to try and isolate the card slot area by covering the surrounding with some Kapton heat resistant tape. This is something I find very handy to have since I regularly use hot hair irons to solder/de-solder. It will help to protect the surrounding area from the heat and also prevent the tiny SMD capacitors and resistors from flying away. It happened to me a few times before and trust me, it is a real pain in the neck to fix since the part usually get lost and then you have no idea of the value of the missing component so replacing it gets very tricky.
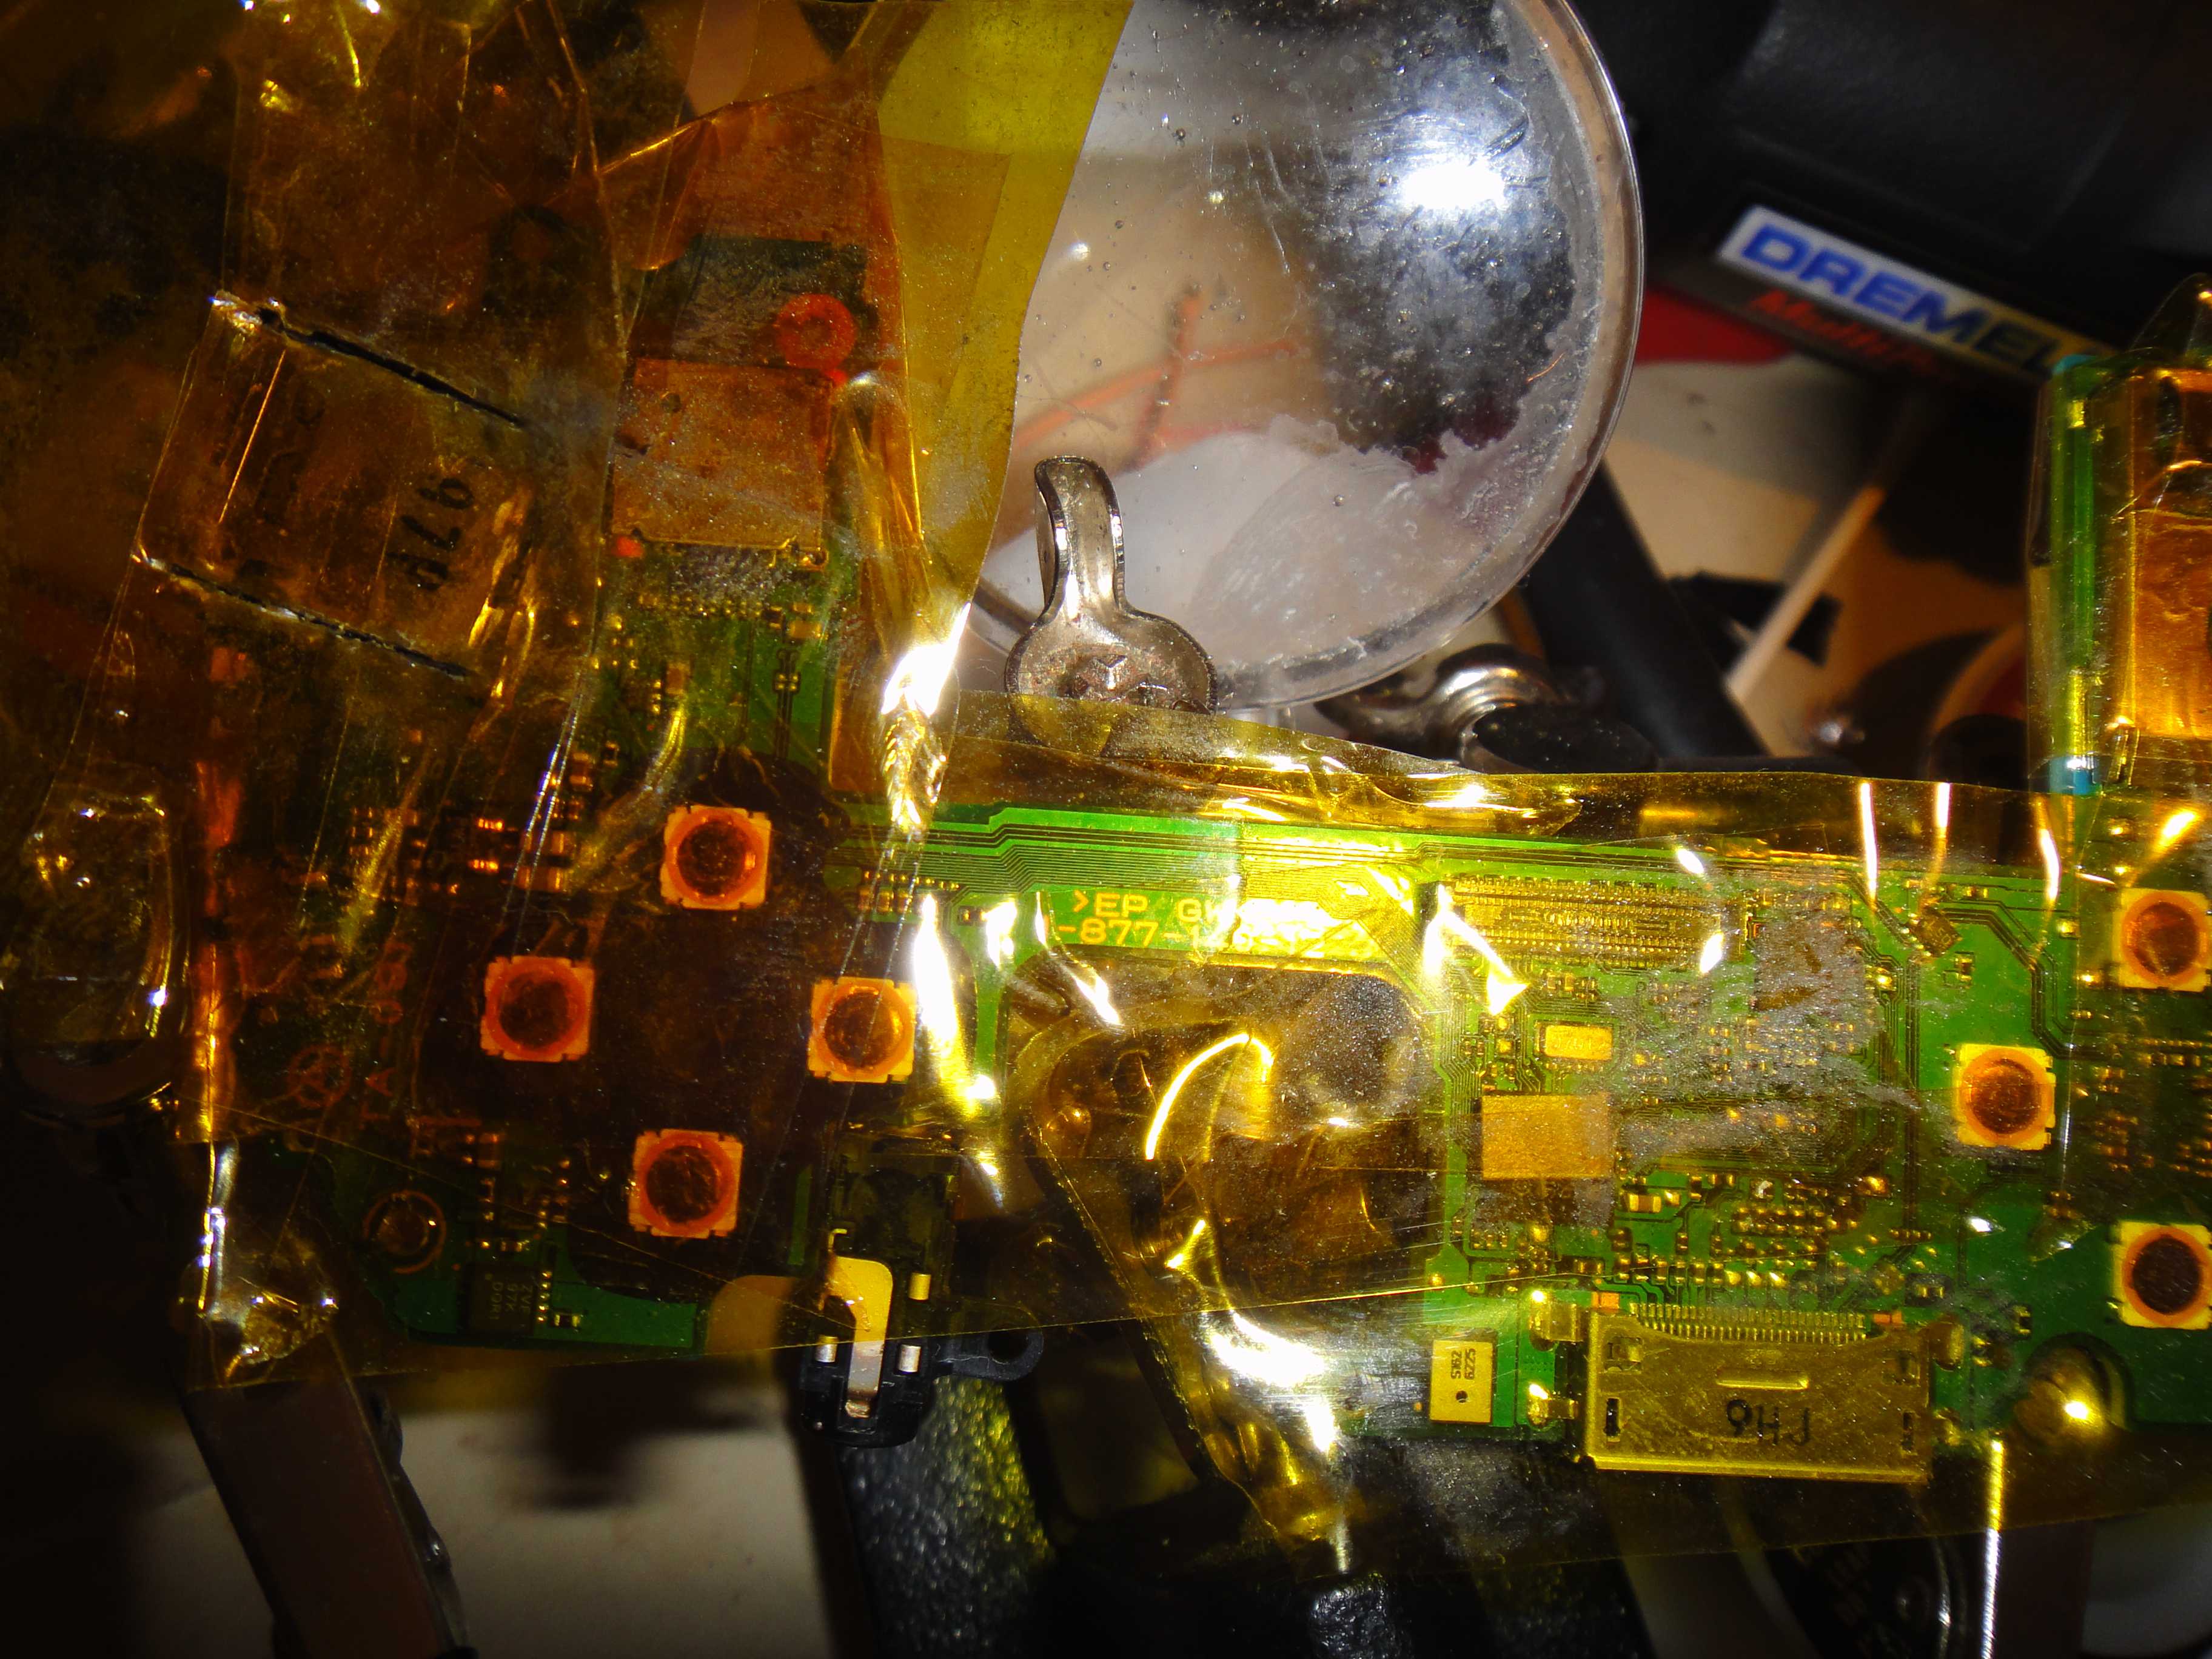
To expose the contact of the card slot, I took my trusty Dremel with the smallest cutting disk I had and carefully cut through the metal shielding. It would be have been very easy to mess something up doing it this way but I was very careful and it was the fastest way I found to go through the shielding. One other thing to keep in mind is that cutting through metal create very fine conductive metal dust and this kind of thing is very bad as it could get stuck under IC legs, connectors, etc. and could create potential short on the board. Since I covered almost the whole board in Kapton tape and only a very small portion would have been exposed to it, I felt that I was not taking a big risk as long as most of the dust would get stuck on the sticky side of the tape and the rest would be blown away in the opposite direction with compressed air.
Once the contacts were exposed and the surrounding area cleaned from the metal dust, I was finally able to de-solder the slot using my hot air soldering station.
Now I needed to figure out the difference in pin out between the two types of card and wire the memory stick slot accordingly. While the pin out is available if you do a quick search on google, I learned the hard way that what people post online is not always accurate so I went and found the memory stick specifications document from Sony to get the information.
Pin #
Memory Stick Micro M2
Memory Stick Duo Pro
1
BS (Bus State Signal)
VSS
2
DATA1
BS (Bus State Signal)
3
DATA0
DATA1
4
DATA2
DATA0 /SDIO
5
INS
DATA2
6
DATA3
INS
7
SCLK (Clock Signal)
DATA3
8
VCC
SCLK (Clock Signal)
9
VSS
VCC
10
N/A
VSS
11
N/A
-
So turn out the pin-out is basically the same provided that you skip the first pin of the Memory Stick Pro Duo (the VSS is doubled)
Now, using some kynar wire (they actually appear much thicker than they are in real life), I wired a Memory Stick Pro Duo card slot salvaged from a broken memory card reader to make sure the signal were wired properly. There's no use to wire the SD card adapter right away if we're not even able to confirm the regular memory stick duo pro was detected and working.
It was a success, the PSP Go would detect the memory stick, show the correct space and I was able to load a game from it.
Before soldering the SD card adapter board inside, I had to replace the SD card slot as the one included would only work with the pressure applied from plastic case.
I got some decent quality micro SD card slot from eBay, a spring loaded one that allow you to eject the card by pushing on it and used it to replace the pin that were used in the card adapter. The footprint of the two slots were the same so it was just a matter of desoldering the old pins, cleaning the contacts and then soldering the new slot to it.
I did a test run with my extended wire first to make sure everything was working.
At first the PSP Go would flash the memory card orange LED constantly but a bit of fondling around and I was able to find and fix a small wiring mistake.
Everything was going according to plan and the PSP detected the SD card. Now that everything was working according to plan, it was time to trim the excess wires and install the card slot where it would lay permanently. This proved to be one of the trickiest parts of this mod as there is very little room inside the PSP Go. I was able to fit it by turning the slot face down so that the adapter PCB could sit over the metal shielding but getting it to line up with the case memory card slot got pretty challenging. What I did was line up the slot and insert the card halfway so that it would keep the slot roughly in place while I was securing it with hot glue.
After some messing around I was finally able to get it fixed and lined up with the shell. I then proceeded to shorten the wires as much as I could, tested again and reassembled the PSP Go.
It worked well and inserting and reinserting didn't seem to cause any issue but I would advise to try and be careful not to overdo it as I had to re-open my up 2 weeks later because one of the kinar wire broke and the card would no longer register. If you can manage to use a more flexible cable I would use it because kynar, while very thin, tend to break easily from bending and being moved around. But considering that you can upload things on the SD card by plugging the USB cable of the PSP Go, you should not really need to remove the card that often if you were to use a big SD card (and you probably are if you are thinking of doing this modification). One issue I had was that the new sd card slot would touch the case a tiny bit, not enough to prevent closing but just enough to create a different feeling when pressing the up arrow. It was working OK but you could feel the resistance was a bit different than the rest of the button. I realized I almost never really needed to swap cards so I decided I would be removing the slot and solder the micro SD card directly inside to make the mod more durable. I will be updating the article in the future to show pictures of this.
Twitter
(function(d, s, id) {
var js, fjs = d.getElementsByTagName(s)[0];
if (d.getElementById(id)) {return;}
js = d.createElement(s); js.id = id;
js.src = "//connect.facebook.net/en_GB/all.js#xfbml=1";
fjs.parentNode.insertBefore(js, fjs);
}(document, 'script', 'facebook-jssdk'));{lang: 'en-GB'}
I was looking on eBay for a new PSP after my regular PSP started to have too many issues and decided to go for a PSP Go. The lack of UMD drive didn't bother me at all since I was mainly using it to play emulator from the memory card and the small size of the PSP Go really appealed to me. My only gripe with it was it's use of expensive proprietary memory card. While the original PSP model did use Memory Stick Duo pro, it wasn't really an issue since there was micro SD to memory stick adapter widely available for a few bucks on eBay. With these, I was able to use regular and much cheaper micro SD card. But the PSP Go use the smaller Memory Stick Micro M2 (will be referred to M" from now on), which is basically a smaller form factor version of the Memory Stick Duo used in the original PSP. Problem is, there is no way that there will ever be a Micro SD to M2 adapter, not because it is not possible because it is, but because of the size of the card. The only way it could be made would have something sticking out of the card slot. The biggest M2 available seem to be 32gb and very expensive. Considering the PSP Go comes with 16gb of built-in memory, it ain't as bad as it could be, but with all the emulators available I still thought it would be nice to use regular micro SD card. So I did what I always do when I have an idea like this and went to search on good old Google only to find out that, surprisingly, nobody seems to have ever attempted such a modification. Or if someone has, they did not document it. This mod was made way back in 2012 but I could never post the article because I had lost my note about it and redo it to confirm my information before posting. As a result, there might be some information available now that wasn't when I looked into it a few years ago.
I figured that the technical aspect of the mod would be very straightforward and trivial. My main concern was more in regard to whether there would be enough space inside the very compact PSP Go. After disassembling my PSP Go and investigating a bit on how it is put together, I decided that I should be able to pull it off and started to think of a plan. My idea was to de-solder the M2 card slot, replace it with a Micro SD card slot and to use the circuit from one of those Micro SD to Memory Stick Pro Duo adapter to do the proper conversion. It should work since the Memory Stick Duo Pro and M2 version are essentially the same thing with different pin-out and form factor. But in order to minimize the headache and troubleshooting later on, I decided I had to test my idea first and have my PSP Go read from a regular Memory Stick Duo Pro. Needless to say that If I couldn't make that happen, the rest of the plan would fall apart. So my first order of business was to figure out the M2 connection on the PSP Go motherboard and wire up a regular Memory Stick Duo Pro card slot to it to do the initial test.
A word of warning before we begin. This modification requires some precise soldering/de-soldering work and it could easily damage your PSP Go system if done improperly. If you are unsure about whether you can do it or not, you should probably avoid attempting this. Or at least be ready for the idea that you might break something, sometime it's the best way to learn;) But even if you mess it up., there is a good chance that you would only lose the use of the memory card, your PSP Go should still function as it should unless you end up breaking a connector or a ribbon cable during dis-assembly.
First thing you need to do is disassemble your PSP Go (obviously), I won't really document that step as there is already many place online where you can get help on that. You can probably do that without information as the PSP Go's assembly is not really that hard to figure out but if you need some help there are many videos on YouTube showing you how to disassemble it. Personally, I am a bit old school when it come to that kind of thing and always prefer a good picture tutorial when I get stuck somewhere, I recommend the excellent tear down guide from ifixit (ifixit PSP Go disassembly guide), they always have high quality pictures for all their teardown guide and are very informative. Once you have gained access to the motherboard, we can get down to business and start removing the M2 card slot. You need to be very careful at that state because the M2 card slot is very tricky to de-solder. You see, the contacts for the slot are not easily accessible, they are basically hidden under the metal housing which makes it close to impossible to remove cleanly. Since I had basically no intention of ever using Sony's proprietary memory card, even if my modding attempt failed, I decided it was OK to scrap it. The PSP go circuit board is very delicate and contain extremely tiny surface mount components so you need to proceed with extreme caution if you are attempting this mod, especially while removing the card slot.
First thing I did was to try and isolate the card slot area by covering the surrounding with some Kapton heat resistant tape. This is something I find very handy to have since I regularly use hot hair irons to solder/de-solder. It will help to protect the surrounding area from the heat and also prevent the tiny SMD capacitors and resistors from flying away. It happened to me a few times before and trust me, it is a real pain in the neck to fix since the part usually get lost and then you have no idea of the value of the missing component so replacing it gets very tricky.
To expose the contact of the card slot, I took my trusty Dremel with the smallest cutting disk I had and carefully cut through the metal shielding. It would be have been very easy to mess something up doing it this way but I was very careful and it was the fastest way I found to go through the shielding. One other thing to keep in mind is that cutting through metal create very fine conductive metal dust and this kind of thing is very bad as it could get stuck under IC legs, connectors, etc. and could create potential short on the board. Since I covered almost the whole board in Kapton tape and only a very small portion would have been exposed to it, I felt that I was not taking a big risk as long as most of the dust would get stuck on the sticky side of the tape and the rest would be blown away in the opposite direction with compressed air.
Once the contacts were exposed and the surrounding area cleaned from the metal dust, I was finally able to de-solder the slot using my hot air soldering station.
Now I needed to figure out the difference in pin out between the two types of card and wire the memory stick slot accordingly. While the pin out is available if you do a quick search on google, I learned the hard way that what people post online is not always accurate so I went and found the memory stick specifications document from Sony to get the information.
Pin #
Memory Stick Micro M2
Memory Stick Duo Pro
1
BS (Bus State Signal)
VSS
2
DATA1
BS (Bus State Signal)
3
DATA0
DATA1
4
DATA2
DATA0 /SDIO
5
INS
DATA2
6
DATA3
INS
7
SCLK (Clock Signal)
DATA3
8
VCC
SCLK (Clock Signal)
9
VSS
VCC
10
N/A
VSS
11
N/A
-
So turn out the pin-out is basically the same provided that you skip the first pin of the Memory Stick Pro Duo (the VSS is doubled)
Now, using some kynar wire (they actually appear much thicker than they are in real life), I wired a Memory Stick Pro Duo card slot salvaged from a broken memory card reader to make sure the signal were wired properly. There's no use to wire the SD card adapter right away if we're not even able to confirm the regular memory stick duo pro was detected and working.
It was a success, the PSP Go would detect the memory stick, show the correct space and I was able to load a game from it.
Before soldering the SD card adapter board inside, I had to replace the SD card slot as the one included would only work with the pressure applied from plastic case.
I got some decent quality micro SD card slot from eBay, a spring loaded one that allow you to eject the card by pushing on it and used it to replace the pin that were used in the card adapter. The footprint of the two slots were the same so it was just a matter of desoldering the old pins, cleaning the contacts and then soldering the new slot to it.
I did a test run with my extended wire first to make sure everything was working.
At first the PSP Go would flash the memory card orange LED constantly but a bit of fondling around and I was able to find and fix a small wiring mistake.
Everything was going according to plan and the PSP detected the SD card. Now that everything was working according to plan, it was time to trim the excess wires and install the card slot where it would lay permanently. This proved to be one of the trickiest parts of this mod as there is very little room inside the PSP Go. I was able to fit it by turning the slot face down so that the adapter PCB could sit over the metal shielding but getting it to line up with the case memory card slot got pretty challenging. What I did was line up the slot and insert the card halfway so that it would keep the slot roughly in place while I was securing it with hot glue.
After some messing around I was finally able to get it fixed and lined up with the shell. I then proceeded to shorten the wires as much as I could, tested again and reassembled the PSP Go.
It worked well and inserting and reinserting didn't seem to cause any issue but I would advise to try and be careful not to overdo it as I had to re-open my up 2 weeks later because one of the kinar wire broke and the card would no longer register. If you can manage to use a more flexible cable I would use it because kynar, while very thin, tend to break easily from bending and being moved around. But considering that you can upload things on the SD card by plugging the USB cable of the PSP Go, you should not really need to remove the card that often if you were to use a big SD card (and you probably are if you are thinking of doing this modification). One issue I had was that the new sd card slot would touch the case a tiny bit, not enough to prevent closing but just enough to create a different feeling when pressing the up arrow. It was working OK but you could feel the resistance was a bit different than the rest of the button. I realized I almost never really needed to swap cards so I decided I would be removing the slot and solder the micro SD card directly inside to make the mod more durable. I will be updating the article in the future to show pictures of this.
Twitter
(function(d, s, id) {
var js, fjs = d.getElementsByTagName(s)[0];
if (d.getElementById(id)) {return;}
js = d.createElement(s); js.id = id;
js.src = "//connect.facebook.net/en_GB/all.js#xfbml=1";
fjs.parentNode.insertBefore(js, fjs);
}(document, 'script', 'facebook-jssdk'));{lang: 'en-GB'}
80 out of
100 with
1 ratings
I was looking on eBay for a new PSP after my regular PSP started to have too many issues and decided to go for a PSP Go. The lack of UMD drive didn't bother me at all since I was mainly using it to play emulator from the memory card and the small size of the PSP Go really appealed to me. My only gripe with it was it's use of expensive proprietary memory card. While the original PSP model did use Memory Stick Duo pro, it wasn't really an issue since there was micro SD to memory stick adapter widely available for a few bucks on eBay. With these, I was able to use regular and much cheaper micro SD card. But the PSP Go use the smaller Memory Stick Micro M2 (will be referred to M" from now on), which is basically a smaller form factor version of the Memory Stick Duo used in the original PSP. Problem is, there is no way that there will ever be a Micro SD to M2 adapter, not because it is not possible because it is, but because of the size of the card. The only way it could be made would have something sticking out of the card slot. The biggest M2 available seem to be 32gb and very expensive. Considering the PSP Go comes with 16gb of built-in memory, it ain't as bad as it could be, but with all the emulators available I still thought it would be nice to use regular micro SD card. So I did what I always do when I have an idea like this and went to search on good old Google only to find out that, surprisingly, nobody seems to have ever attempted such a modification. Or if someone has, they did not document it. This mod was made way back in 2012 but I could never post the article because I had lost my note about it and redo it to confirm my information before posting. As a result, there might be some information available now that wasn't when I looked into it a few years ago.
I figured that the technical aspect of the mod would be very straightforward and trivial. My main concern was more in regard to whether there would be enough space inside the very compact PSP Go. After disassembling my PSP Go and investigating a bit on how it is put together, I decided that I should be able to pull it off and started to think of a plan. My idea was to de-solder the M2 card slot, replace it with a Micro SD card slot and to use the circuit from one of those Micro SD to Memory Stick Pro Duo adapter to do the proper conversion. It should work since the Memory Stick Duo Pro and M2 version are essentially the same thing with different pin-out and form factor. But in order to minimize the headache and troubleshooting later on, I decided I had to test my idea first and have my PSP Go read from a regular Memory Stick Duo Pro. Needless to say that If I couldn't make that happen, the rest of the plan would fall apart. So my first order of business was to figure out the M2 connection on the PSP Go motherboard and wire up a regular Memory Stick Duo Pro card slot to it to do the initial test.
A word of warning before we begin. This modification requires some precise soldering/de-soldering work and it could easily damage your PSP Go system if done improperly. If you are unsure about whether you can do it or not, you should probably avoid attempting this. Or at least be ready for the idea that you might break something, sometime it's the best way to learn;) But even if you mess it up., there is a good chance that you would only lose the use of the memory card, your PSP Go should still function as it should unless you end up breaking a connector or a ribbon cable during dis-assembly.
First thing you need to do is disassemble your PSP Go (obviously), I won't really document that step as there is already many place online where you can get help on that. You can probably do that without information as the PSP Go's assembly is not really that hard to figure out but if you need some help there are many videos on YouTube showing you how to disassemble it. Personally, I am a bit old school when it come to that kind of thing and always prefer a good picture tutorial when I get stuck somewhere, I recommend the excellent tear down guide from ifixit (ifixit PSP Go disassembly guide), they always have high quality pictures for all their teardown guide and are very informative. Once you have gained access to the motherboard, we can get down to business and start removing the M2 card slot. You need to be very careful at that state because the M2 card slot is very tricky to de-solder. You see, the contacts for the slot are not easily accessible, they are basically hidden under the metal housing which makes it close to impossible to remove cleanly. Since I had basically no intention of ever using Sony's proprietary memory card, even if my modding attempt failed, I decided it was OK to scrap it. The PSP go circuit board is very delicate and contain extremely tiny surface mount components so you need to proceed with extreme caution if you are attempting this mod, especially while removing the card slot.
First thing I did was to try and isolate the card slot area by covering the surrounding with some Kapton heat resistant tape. This is something I find very handy to have since I regularly use hot hair irons to solder/de-solder. It will help to protect the surrounding area from the heat and also prevent the tiny SMD capacitors and resistors from flying away. It happened to me a few times before and trust me, it is a real pain in the neck to fix since the part usually get lost and then you have no idea of the value of the missing component so replacing it gets very tricky.
To expose the contact of the card slot, I took my trusty Dremel with the smallest cutting disk I had and carefully cut through the metal shielding. It would be have been very easy to mess something up doing it this way but I was very careful and it was the fastest way I found to go through the shielding. One other thing to keep in mind is that cutting through metal create very fine conductive metal dust and this kind of thing is very bad as it could get stuck under IC legs, connectors, etc. and could create potential short on the board. Since I covered almost the whole board in Kapton tape and only a very small portion would have been exposed to it, I felt that I was not taking a big risk as long as most of the dust would get stuck on the sticky side of the tape and the rest would be blown away in the opposite direction with compressed air.

Once the contacts were exposed and the surrounding area cleaned from the metal dust, I was finally able to de-solder the slot using my hot air soldering station.

Now I needed to figure out the difference in pin out between the two types of card and wire the memory stick slot accordingly. While the pin out is available if you do a quick search on google, I learned the hard way that what people post online is not always accurate so I went and found the memory stick specifications document from Sony to get the information.
| Pin # |
Memory Stick Micro M2 |
Memory Stick Duo Pro |
| 1 |
BS (Bus State Signal) |
VSS |
| 2 |
DATA1 |
BS (Bus State Signal) |
| 3 |
DATA0 |
DATA1 |
| 4 |
DATA2 |
DATA0 /SDIO |
| 5 |
INS |
DATA2 |
| 6 |
DATA3 |
INS |
| 7 |
SCLK (Clock Signal) |
DATA3 |
| 8 |
VCC |
SCLK (Clock Signal) |
| 9 |
VSS |
VCC |
| 10 |
N/A |
VSS |
| 11 |
N/A |
- |
So turn out the pin-out is basically the same provided that you skip the first pin of the Memory Stick Pro Duo (the VSS is doubled)

Now, using some kynar wire (they actually appear much thicker than they are in real life), I wired a Memory Stick Pro Duo card slot salvaged from a broken memory card reader to make sure the signal were wired properly. There's no use to wire the SD card adapter right away if we're not even able to confirm the regular memory stick duo pro was detected and working.


It was a success, the PSP Go would detect the memory stick, show the correct space and I was able to load a game from it.
Before soldering the SD card adapter board inside, I had to replace the SD card slot as the one included would only work with the pressure applied from plastic case.

I got some decent quality micro SD card slot from eBay, a spring loaded one that allow you to eject the card by pushing on it and used it to replace the pin that were used in the card adapter. The footprint of the two slots were the same so it was just a matter of desoldering the old pins, cleaning the contacts and then soldering the new slot to it.
I did a test run with my extended wire first to make sure everything was working.

At first the PSP Go would flash the memory card orange LED constantly but a bit of fondling around and I was able to find and fix a small wiring mistake.
Everything was going according to plan and the PSP detected the SD card. Now that everything was working according to plan, it was time to trim the excess wires and install the card slot where it would lay permanently. This proved to be one of the trickiest parts of this mod as there is very little room inside the PSP Go. I was able to fit it by turning the slot face down so that the adapter PCB could sit over the metal shielding but getting it to line up with the case memory card slot got pretty challenging. What I did was line up the slot and insert the card halfway so that it would keep the slot roughly in place while I was securing it with hot glue.
After some messing around I was finally able to get it fixed and lined up with the shell. I then proceeded to shorten the wires as much as I could, tested again and reassembled the PSP Go.


It worked well and inserting and reinserting didn't seem to cause any issue but I would advise to try and be careful not to overdo it as I had to re-open my up 2 weeks later because one of the kinar wire broke and the card would no longer register. If you can manage to use a more flexible cable I would use it because kynar, while very thin, tend to break easily from bending and being moved around. But considering that you can upload things on the SD card by plugging the USB cable of the PSP Go, you should not really need to remove the card that often if you were to use a big SD card (and you probably are if you are thinking of doing this modification). One issue I had was that the new sd card slot would touch the case a tiny bit, not enough to prevent closing but just enough to create a different feeling when pressing the up arrow. It was working OK but you could feel the resistance was a bit different than the rest of the button. I realized I almost never really needed to swap cards so I decided I would be removing the slot and solder the micro SD card directly inside to make the mod more durable. I will be updating the article in the future to show pictures of this.